- 开源的Python Web框架
- MVC模式
使用Django 必须先安装Python,推荐安装3.0版本以上的Python3
然后再用pip安装工具安装Django
由于我安装的是python3 所以我的pip工具是pip3
安装命令pip3 install django==2.0
最后选择适合自己的IDE
我使用的是VSCode
优点
- 开发效率高
- 功能强大,丰富的第三方插件
- 重视安全,避免安全漏洞
命令语句django-admin 检查django是否成功安装。
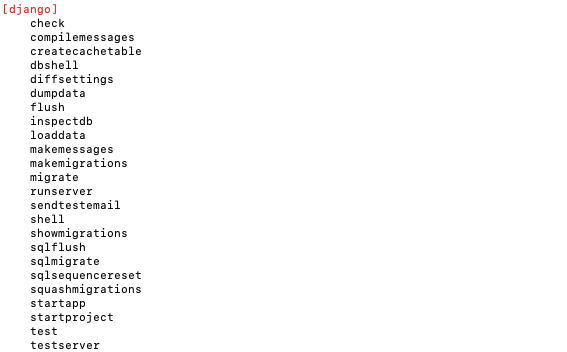
- startproject # 创建一个django项目
- startapp # 创建一个django应用
- check # 检验项目完整性
- runserver # 本地简易运行django项目
- shell # 进入django项目的python shell环境
- test # 执行django用例测试
数据库相关
- makemigrations # 创建模型变更的迁移文件
- migrate # 执行上一个命令创建的迁移文件
- dumpdata # 把数据库数据导出到文件
- loaddata # 把文件数据导入到数据库
Django 应用 VS Django项目
首先要明白Django项目和应用的区别
- 1个Django项目就是一个基于Django的web应用
- 1个Django应用就是一个可重用的python软件包
- 1个Django应用可以自己管理模型视图模版路由和静态文件
- 1个Django项目可以包含一组配置和若干个Django应用。
创建一个Django项目
创建一个项目
django-admin startproject django_intrduction用VSCode打开项目文件夹
结构目录如下
Django_instrduction
Django_instrduction
- init.py//项目初始化
- setting.py//🌟项目配置文件
- urls.py//项目路由配置文件
- wsgi.py//python服务器网关接口
manage.py//项目管理文件
运行项目 终端命令
python3 manage.py runserver
Django项目重要文件介绍
setting.py
import os

# Build paths inside the project like this: os.path.join(BASE_DIR, ...)
BASE_DIR = os.path.dirname(os.path.dirname(os.path.abspath(__file__)))#项目根目录


# Quick-start development settings - unsuitable for production
# See https://docs.djangoproject.com/en/2.0/howto/deployment/checklist/

# SECURITY WARNING: keep the secret key used in production secret!
SECRET_KEY = '7bet#*gq%**^7*)5m%)avx&sg6yv_^&t5b!@8+$(&of&_^1wv)'#项目安全码

# SECURITY WARNING: don't run with debug turned on in production!
DEBUG = True #不要在正式环境中打开 如果打开的话异常会抛到前端

ALLOWED_HOSTS = []
#ALLOWED_HOSTS = ['localhost'] 只允许host是数组中的内容的地址访问我们的网站 其他地址都屏蔽了


# Application definition

INSTALLED_APPS = [
    'django.contrib.admin',
    'django.contrib.auth',
    'django.contrib.contenttypes',
    'django.contrib.sessions',
    'django.contrib.messages',
    'django.contrib.staticfiles',
    'blog.apps.BlogConfig',#自己创建的应用要写在这里面 才能被识别
]

MIDDLEWARE = [
    'django.middleware.security.SecurityMiddleware',
    'django.contrib.sessions.middleware.SessionMiddleware',
    'django.middleware.common.CommonMiddleware',
    'django.middleware.csrf.CsrfViewMiddleware',
    'django.contrib.auth.middleware.AuthenticationMiddleware',
    'django.contrib.messages.middleware.MessageMiddleware',
    'django.middleware.clickjacking.XFrameOptionsMiddleware',
]

ROOT_URLCONF = 'django_intrduction.urls'

#django中的模板就是一个个的html文件
TEMPLATES = [
    {
        'BACKEND': 'django.template.backends.django.DjangoTemplates',
        'DIRS': [],
        'APP_DIRS': True,
        'OPTIONS': {
            'context_processors': [
                'django.template.context_processors.debug',
                'django.template.context_processors.request',
                'django.contrib.auth.context_processors.auth',
                'django.contrib.messages.context_processors.messages',
            ],
        },
    },
]
创建一个Django应用
创建一个应用
运行项目 终端命令
python3 manage.py startapp 应用名用VSCode打开项目文件夹
结构目录如下
Django_instrduction
应用名
- views.py//🌟执行响应的代码所在模块,大部分代码都在这里
- models.py//定义应用模型、使用orm框架
- apps.py //声明应用的地方
- admin.py //定义admin模块管理的地方、后台管理配置
- tests.py //自动化测试模块,编写测试用例的地方
- urls.py //(自行创建)管理应用路由的地方
Django_instrduction
- init.py//项目初始化
- setting.py//项目配置文件
- urls.py//项目路由配置文件
- wsgi.py
manage.py//项目管理文件
Django HelloWorld
Django 视图
大部分代码都写在views.py当中,所以编辑views是非常重要的,
- 每个响应对应一个函数,函数必须返回一个响应。
- 函数必须存在一个参数,一般约定为request
- 每个响应函数对应一个url
//views.py
from django.shortcuts import render
from django.http import HttpResponse
# Create your views here.
def hello_world(request):
    return HttpResponse("hello world")
Django 路由
- 每个URL都以url的形式写出来
- url函数放在urlpatterns列表中
应用路由
from django.urls import path,include

import blog.views


urlpatterns = [
    path("hello_world",blog.views.hello_world)
]
项目路由
from django.contrib import admin
from django.urls import path,include

urlpatterns = [
    path('admin/', admin.site.urls),
    path('blog/', include("blog.urls")),
]
概念介绍及实战
Django 模型
模型层简介
模型层是什么
- 位于视图层和数据库之间
- python对象和数据表之间转换
为什么需要模型层
- 屏蔽不同的数据库之间的差异
- 开发者更加专注于业务逻辑的开发
- 提供很多便捷工具有助开发
创建博客文章模型
设计播客文章模型
- 文章标题——文本类型
- 文章摘要——文本类型
- 文章内容——文本类型
- 唯一id标记——int类型(自增、主键)
- 发布日期——日期类型
模型层常用字段
- 数字类型:
- IntegerField()#整数 11个字节
- BigIntegerField()#整数 20个字节
- PositiveIntegerField()#正整数 10个字节
- SmallIntegerField()#整数 6个字节
- PositiveSmallIntegerField()#正整数 5个字节
- 文本类型:
- TextField()#longtext
- CharField()#varchar
- 布尔类型
- BooleanField()#允许为空
- NullBooleanField()#不允许为空
- 浮点型
- FloatField()
- DecimalField()#指定整数和小数各多少位
- 日期类型:
- DateTimeField()#年月日时分秒
- DateField()# 年月日
- DurationField()#一段时间 int类型
- 自增ID:
- AutoField()
- BigAutoField()//接受更大的值
- 主键定义:primary_key属性
二进制数据
- BinaryField()
其他类型
- EmailField()#邮箱
- ImageField()#图片
- FileField()#文件
- FilePathField()#文件路径
- UrlField()
- UUIDField()
- GenericIPAddressField()#ip地址
模型层关系型字段
- 一对一(OneToOneField)
- 多对一(ForeignKey)
- 多对多(ManyToManyField)
生成数据表
- 命令行进入到manage.py同级目录
- 执行python3 manage.py makemigrations appname(可选)
- 执行python3 manage.py migrate
Demo
- 在应用的 models.py 定义模型
from django.db import models
# Create your models here.
class Aritcle(models.Model):

    aritcle_id = models.AutoField(primary_key=True)
    title = models.TextField()
    brief_content = models.TextField()
    content = models.TextField()
    publish_date = models.DateTimeField(auto_now=True)

    def __str__(self):
        return self.title

# 演示关系型model
class A(models.Model):
    onetoone = models.OneToOneField(Aritcle)

class B(models.Model):
    foreign = models.ForeignKey(A)

class C(models.Model):
    manytomany = models.ManyToManyField(B)
然后迁移模型定义到数据库当中
- python3 manage.py makemigrations appname
Alexs-MacBook-Air:django_intrduction alexwee$ python3 manage.py makemigrations blog
Migrations for 'blog':

  blog/migrations/0001_initial.py

    - Create model Aritcle
运行迁移文件 把迁移文件的内容同步到数据库中
- python3 manage.py migrate appname
Alexs-MacBook-Air:django_intrduction alexwee$ python3 manage.py migrate  blog
Operations to perform:

Apply all migrations: blog

Running migrations:

Applying blog.0001_initial... OK
Django shell
Python shell 用于交互式的python编程
Django shell 也类似继承django项目环境
为什么要使用django shell
- 临时性操作使用django shell更加方便
- 小范围的debug更简单,不需要运行整个项目来测试
- 方便开发 方便调试 方便debug
demo
使用django shell 新建文章
python3 manage.py shell进入shell 环境Python 3.7.1 (v3.7.1:260ec2c36a, Oct 20 2018, 03:13:28) [Clang 6.0 (clang-600.0.57)] on darwin
Type "help", "copyright", "credits" or "license" for more information.
(InteractiveConsole)
>>>在shell环境新建文章并保存到数据库
from blog.models import Aritcle
>>> a = Aritcle()

>>> a.title = "test django shell"

>>> a.brief_content = "test django shell by maweefeng"

>>> a.content = "test django shell new ariticle main content"

>>>

>>>

>>>

>>> print(a)

Aritcle object (None)

>>> a.save()//保存到数据库

>>>
验证文章是否保存到数据库
>>> ariticle = Aritcle.objects.all()//取出所有文章
>>> aricle = ariticle[0]//取到第一篇文章

>>> print(aricle.title)

<class 'django.db.models.fields.TextField'>

>>>

>>> print(aricle)

Aritcle object (1)

>>> print(aricle.content)

<class 'django.db.models.fields.TextField'>

>>>
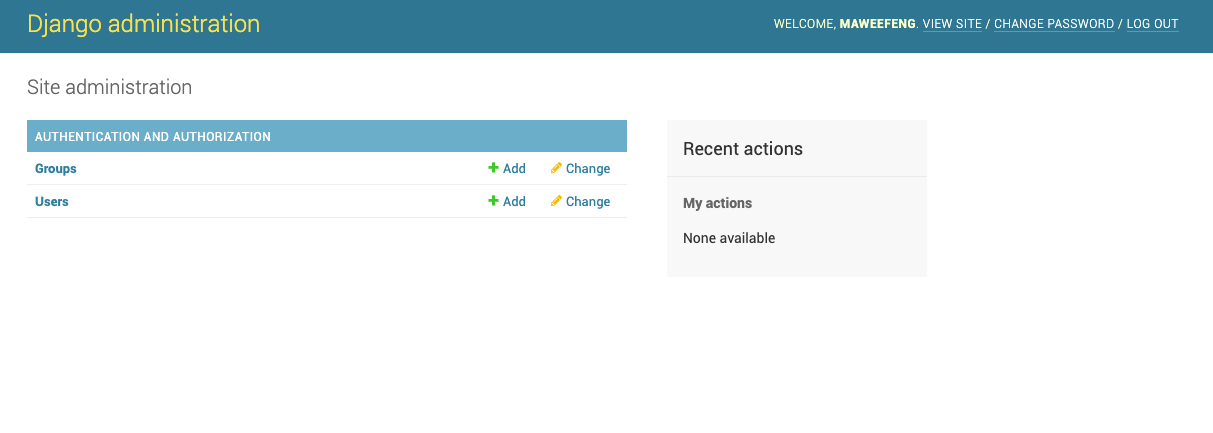
django admin模块
django admin模块是什么
- 是一个后台管理工具,不需要用户开发后台管理工具
- 可以读取定义的模型元数据,提供强大的管理使用页面
为什么要使用django admin模块
- django shell 新建文章太复杂了
- 管理页面是基础设施中重要的部分
- 认证用户,显示管理模型,校验输入等功能类似
使用方法
- 创建管理员用户
python3 manage.py createsuperuser
* Alexs-MacBook-Air:django_intrduction alexwee$ python3 manage.py createsuperuser
Username (leave blank to use 'alexwee'): maweefeng
address:
Password:
Password (again):
Superuser created successfully.
Alexs-MacBook-Air:django_intrduction alexwee$
登陆页面进行管理
- 项目跑起来
python3 manage.py runserver - 浏览器输入 http://127.0.0.1:8000/admin 进入登陆页面
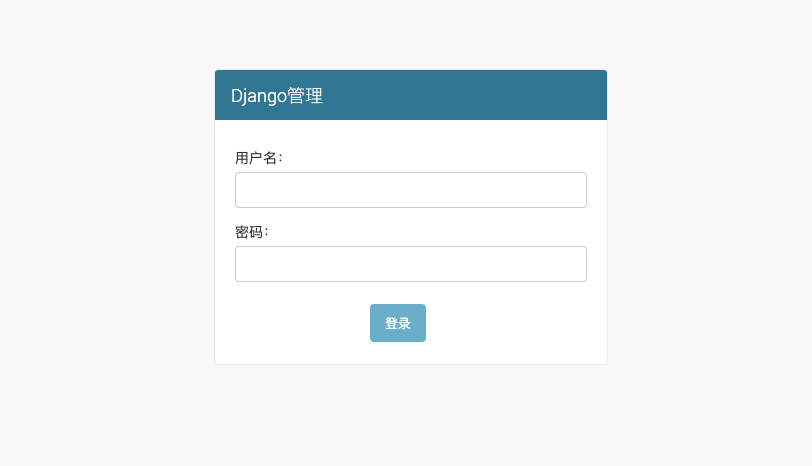
- 项目跑起来
但是没有看到刚才新建的文章模型,是因为我们还没有把模型注册到admin中,进入IDE中的应用目录下的admin.py
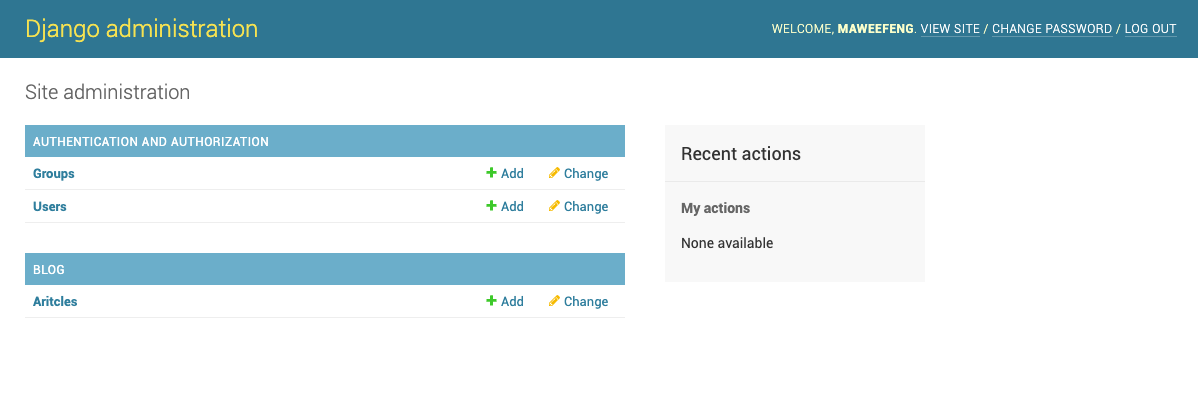
from django.contrib import admin

# Register your models here.

from .models import Aritcle

admin.site.register(Aritcle)
回到浏览器刷新 就有了新的分组
实现播客数据返回页面
类似于之前返回的helloworld项目
应用视图 views.py
from django.shortcuts import render
from django.http import HttpResponse

from blog.models import Summary

# Create your views here.

def hello_world(request):

    return HttpResponse("hello world")

def ariticle_content(request):

    summary = Summary.objects.all()[0]

    title = summary.summary_title

    content = summary.summary_content

    summary_id = summary.summary_id

    pubdate = summary.publish_date

    return_str = 'title:%s summary_content:%s summary_id:%s publicdate:%s'%(title,content,summary_id,pubdate)

    return HttpResponse(return_str)
应用路由 urls.py
from django.urls import path,include
import blog.views

urlpatterns = [

    path("hello_world",blog.views.hello_world),

    path("content",blog.views.ariticle_content)

]
项目路由 urls.py
from django.contrib import admin
from django.urls import path,include

urlpatterns = [

    path('admin/', admin.site.urls),

    path('blog/', include("blog.urls")),

]
Django视图与模板
使用Bootstrap实现静态博客页面
页面布局设计
- 博客首页
- 文章详情页
Bootstrap 以及 Bootstrap的栅格系统
Bootstrap是来自美国twitter的前端框架,提供非常多的控件以及源码,栅格系统就是把web页面分成几等份排列的方式。
创建模板文件夹并实现静态页面
在应用文件夹内部新建文件夹templates,然后在里面新建html文件,这是很关键的一步
⚠️注意事项
还有需要注意的是最好在templates文件夹中再新建应用名所属的文件夹,然后在应用名所属的文件夹中新建html文件,这是因为Django查找templates是按照INSTALLED_APPS中的添加顺序查找templats,所以不同应用下的templates的html同名会造成冲突。
认识Django的模版系统
python的视图文件不适合编码html,因为页面设计改变需要修改python代码,比较复杂。另外网页的逻辑和视图应该分开设计。
模版系统的表现形式是文本,分离文档的表现形式和表现内容,模版系统定义了特有的标签占位符。
学习模版系统的基本语法
- 变量标签:{{变量}}
for循环标签:{% for x in list %},{% endfor %}
  <ul>
    {% for item in list%}

    <li>{{item}}</li>

    {% endfor%}

    </ul>
if-else标签:{% if %},{% else %},{%endif%}
 {% if true %}
        <p>it is true part</p>

    {%else%}

        <p>it is false part</p>

    {% endif %}
使用模版系统渲染博客页面
render渲染函数
- render() 函数中支持一个dict类型的参数
- 该字典是后台传递到模板的参数,键为参数名
在模板中使用{{参数名}}来直接使用
def render(request, template_name, context=None, content_type=None, status=None, using=None)
Return a HttpResponse whose content is filled with the result of calling django.template.loader.render_to_string() with the passed arguments.
编写django应用的views.py
from django.shortcuts import render
from django.http import HttpResponse
from blog.models import Summary,Article

def get_index_page(request):
    all_ariticle = Summary.objects.all()
    return render(request,'blog/index.html',{'aritcle_list':all_ariticle})
实现文章详情页面跳转
Django中的超链接
1⃣️ 直接拼接
直接在a标签的href中拼接需要点击跳转的路径 在html的表现形式为
<a href="/blog/detail/{{item.summary_id}}"></a>
2⃣️ 参数以及命名空间
- href后面是目标地址
- templates中可以用
"{% url 'app_name:url_name' param%}" - 其中app_name 和 url_name都在url中配置。
url函数的名称参数
- 项目urls.py 写在include()的第二个参数位置,namespace='blog',还要在第一个参数中传入一个包含appname的元组 见下面demo
- 应用下则写在url()的第三个参数位置,写上name=‘方法名’
- 主要取决于是否使用include引用了另一个url配置文件
Demo
django项目的urls.py
  from django.contrib import admin
from django.urls import path,include

urlpatterns = [

    path('admin/', admin.site.urls),

    path('blog/', include(("blog.urls",'blog'),namespace='blog')),

]
django应用的urls.py
from django.urls import path,include
import blog.views

urlpatterns = [

    path("hello_world",blog.views.hello_world),

    path("index",blog.views.get_index_summary_page),

    path("detail/<int:article_id>",blog.views.get_index_page,name='get_index_page')

]
django应用的views.py
def get_detail_page(request,summary_id):
    all_ariticle = Summary.objects.all()

    cur_article = None

    for aritcle in all_ariticle:

        if aritcle.summary_id == summary_id:

            cur_article = aritcle

            break

    sectionList = cur_article.summary_content.split('\n')

return render(request,'blog/detail.html',{'curr_aritcle':cur_article,'section_list':sectionList})
html超链接部分代码写法
<a href="{% url 'blog:get_detail_page' item.summary_id %}"></a>
实现分页功能
参数request包含了一些get以及post的信息。
django应用的views.py
def get_index_page(request):
    # 适用与/index?page=1之类的网络请求

    page = request.GET.get('page')

    if page:

        page = int(page)

    else:

        page = 1

    all_ariticle = Summary.objects.all()

    return render(request,'blog/index.html',{'aritcle_list':all_ariticle})
django分页组件Paginator
在views.py中引入分页组件
from django.core.paginator import Paginator
def get_index_page(request):

    # 适用与/index?page=1之类的网络请求

    page = request.GET.get('page')

    if page:

        page = int(page)

    else:

        page = 1

    all_ariticle = Summary.objects.all()

    paginator = paginator(all_ariticle,3)

    page_aritcle_list = paginator.page(page)

    page_num = paginator.num_pages

    if page_aritcle_list.has_next():

        next_page = page + 1

    else:

        next_page = page

    if page_aritcle_list.has_previous():

        previous_page = page - 1

    else:

        previous_page = page

    return render(request,'blog/index.html',{

        'aritcle_list':page_aritcle_list,

        'page_num':range(1,page_num+1),

        "curr_page":page,

        'next_page':next_page,

        'previous_page':previous_page

        }

        )
补充部分 ORM
ORM
- 对象关系映射(object relation mapping)
- 实现了对象和数据库之间的映射
- 隐藏了数据访问的细节,不需要编写sql语句
如何删除一个模型类
- 首先删除models.py中模型类的代码
- 删除模型类在migrations文件夹中对应的文件
- 删除django_migrations中对应的生成记录
- 再删除模型对应的数据表
切记不要直接把数据库整个删掉再生成,尤其是当数据库中有数据的时候。
如何导入数据
django shell
from blog.models import Aritcle
>>> a = Aritcle()

>>> a.title = "test django shell"

>>> a.brief_content = "test django shell by maweefeng"

>>> a.content = "test django shell new ariticle main content"

>>> a.save()//保存到数据库
脚本批量导入
import os
import sys

import random

import django

from datetime import date

# 在当前项目中运行该python脚本

project_path = os.path.dirname(os.path.dirname(os.path.abspath(__file__)))

sys.path.append(project_path)

os.environ['DJANGO_SETTINGS_MODULE'] = 'Django_ORM.settings'

django.setup()

from orm.models import Aritcle

#上面这行必须在django.setup()之后

def import_data():

    for i in [1,2,3,4,5,6,7,8,9,10]:

         Aritcle.objects.create(title = '这个是标题%s'%(i),brief_content='这个是简介',content='这个是内容我们都有一个家名字叫中国')

    return True

if __name__ == "__main__":

    if import_data():

        print('插入数据成功')
fixtures
使用django serialization 生成 model终端命令导出数据
python3 manage.py dumpdata > orm.json生成了一个json文件然后从数据库中删除部分数据
执行命令从json中导入数据
python3 manage.py loaddata orm.json数据库中重新出现了刚才删除的数据(因为从json中重新导入了数据)
数据库层面的导入数据
如何导出数据
导出fixtures能识别的json文件
- 终端命令导出数据
python3 manage.py dumpdata > orm.json生成了一个json文件
- 终端命令导出数据
导出其他格式的文件
pcharm自带的数据库工具,单选某个表右键dump data to file
nivacate datum等数据库工具导出数据

数据库层面的导出数据
ModelsAPI
查询集介绍
查询 过滤 检索
Aritcle.objects.all()#返回所有结果
Aritcle.objects.get(title='这是一个标题')#返回一个结果 多条则会报错

Aritcle.objects.filter(star__gte = 500)#queryset可以是多条结果 fans >=500的结果
字段数据匹配 大小写敏感
teacher = Aritcle.objects.filter(star__in=[555,1231])
teacher = Aritcle.objects.filter(title__contains='a')
结果切片 排序 链式查询
Aritcle.objects.all()[:1]
Aritcle.objects.all().order_by('star')#升序排序

Aritcle.objects.all().order_by('-star')#降序排序

Aritcle.objects.filter(star__gte = 500).order_by('-star')#链式查询
查看执行的原生SQL xxx.query
print(str(Aritcle.objects.filter(star__gte = 500).order_by('-star').query))
返回新的QuerySet的API
all() filter() order_by() exclude()去掉某个model reverse()反转 distinct()去重
Aritcle.objects.all().exclude(title = 'title')
Aritcle.objects.all().exclude(title = 'title').reverse()
extra() defer() only() 实现字段别名 排除一些字段 选择一些字段
Aritcle.objects.all().extra(select={'article_title'='title'})
Aritcle.objects.all().only('title','star').query()
dates() datetimes() 根据时间日期获取查询集
Aritcle.objects.dates('publish_date','month',order ='DESC')union() intersection() difference() 并集 交集 差集
a_500 = Aritcle.objects.filter(star__gte = 500)
a_200 = Aritcle.objects.filter(star__lte = 200)

print(a_500.union(a_200))

print(a_500.intersection(a_200))

print(a_500.difference(a_200))
select_related() 一对一 多对一查询优化 prefetch_related() 一对多 多对多查询优化 反向查询
Aritcle.objects.all().select_related('author')
Audiences.objects.filter(star__gte = 500).prefetch_related('article')
annotate() 使用聚合计数 求和 平均数 raw()执行原声sql
# 对每个文章关联的作者的评🌟进行统计
Aritcle.objects.values('author').annotate(vol=Sum('star'))

# vol star 总和

Aritcle.objects.values('author').annotate(ave=Avg('star'))

# ave star 求平均值
values() values_list() 获取字典或者元祖形式的queryset
Aritcle.objects.values('title','star')
Aritcle.objects.values_list('title','star')
不返回QuerySet的API
获取对象 get()获取单个对象 get_or_create()获取或者创建 first() last() latest() earliest() in_bulk()
创建对象 create() bulk_create() create_or_update() 创建 批量创建 创建或更新
更新对象 update() update_or_create()更新 更新或创建
Aritcle.objects.filter(star__gte = 500).update(star=20)删除对象delete() 使用filter过滤
Aritcle.objects.filter(star__gte = 500).delete()其他操作exists() count() aggregate()判断是否存在 统计个数 聚合
Aritcle.objects.filter(star = 500).exists()
Aritcle.objects.count()

Aritcle.objects.aggregate(Max('star',Min('star'),Avg('star')))
自定义聚合查询 实现group_concat
在models.py 中自定义继承自models.Aggregate 的类GroupConcat
class GroupConcat(models.Aggregate):
    function = 'Group_Concat'
    template = '%(fuction)s(%(distinct)s%(expressions)s%(ordering)s%(separator)s)'

    def __init__(self,expression,distinct=False,ordering=None,separator=',',**extra):
        super(GroupConcat,self).__init__(expression,
        distinct='DISTINCT' if distinct else '',
        ordering = 'ORDER BY %s' % ordering if ordering is not None else '',
        separator = 'SEPARATOR "%s"'%separator,
        output_field=models.CharField(),**extra)
views.py
Aritcle.objects.values('author').annotate(title=GroupConcat('title',distinct=True,ordering='title ASC',separator='-'))